Pages

Monday, August 13, 2018

VW Gateway Coding: with ODIS or VCDS?

Look here: How to do gateway coding to VW or other VAG group vehicles:
- gateway coding purpose
- odis gateway coding
- vcds gateway coding
in detail....
Why do you need to gateway coding?
Some VW/Skoda vehicles require the CAN Gateway in the vehicle to be coded to accept the             Bluetooth Gateway kit. The kit will function without the CAN Gateway being coded but there will  be no phone screen available in the vehicles MFD+ cluster display. If the kit is installed and the  phone screen is available in the MFD+ cluster display then the vehicle does not require coding.
How to use ODIS software for gateway coding?
odis crack should work but you should have an account for gateway coding.
vag diagnostic tools are confirmed to do coding without any issue:
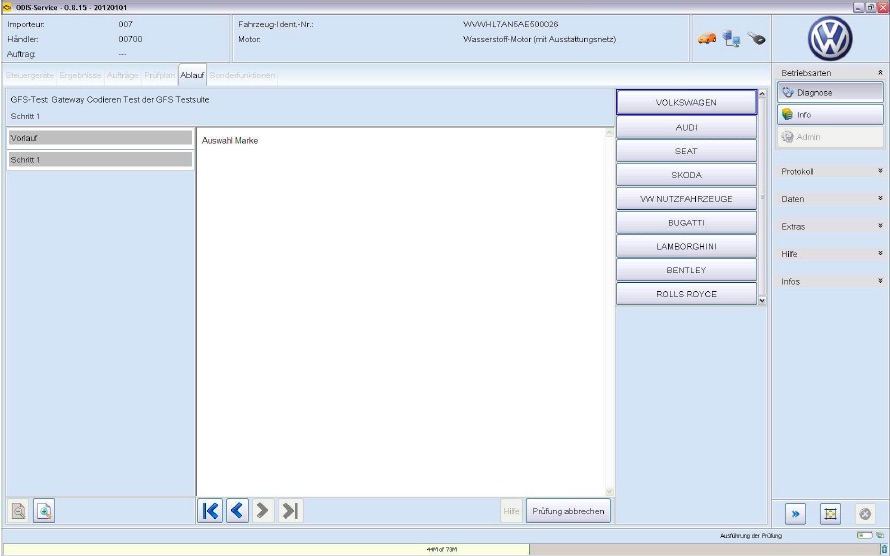
If a program for Gateway coding is accessed, the test sequence will have a few special instructions. The following describes these.
The test program determines which control module is already coded in Gateway and which additional control
modules are available for selection. These are shown to the user in a dialog.
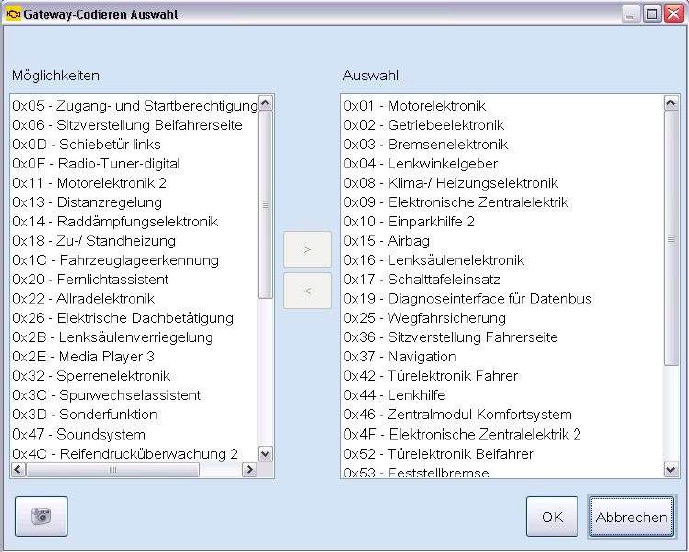
gateway-coding-with-odis-1
(Selection of control module to be coded)
All control modules are listed in the left column, which from the data were identified and are still not marked in
Gateway as installed.
The control modules in the right column are marked as in Gateway as installed.
>  describes the control modules in the right list.
<  describes the control modules in the left list.
OK : Coding with the current selection continues.
Cancel : the selection is discarded and coding is cancelled.
If you confirm the dialog with OK, the selection is shown in a list. The control modules coded or to be coded
appear in front of the not coded ones.
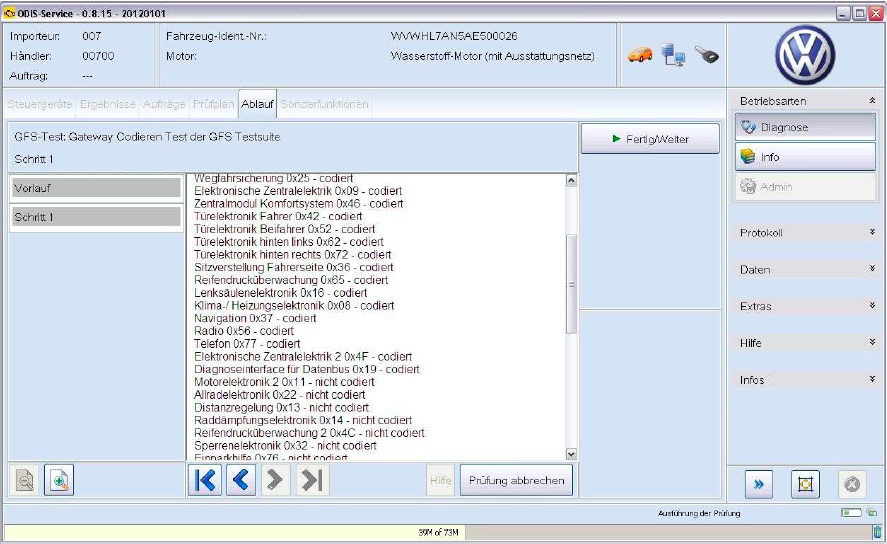
gateway-coding-with-odis-2
(Display of the coded/not coded control modules in the test program)
If you continue the test program with End/Continue, then additional decisions for  special coding must be made
for some vehicles. You will be asked for vehicle brand, vehicle version, the number of door and if the vehicle has
right-hand or left-hand drive. This information is already in the Gateway control module and can be changed by
the user. The information read from the Gateway is framed in blue.
This inquiry for this information is also constructed the same and displays the brand as shown in the example:
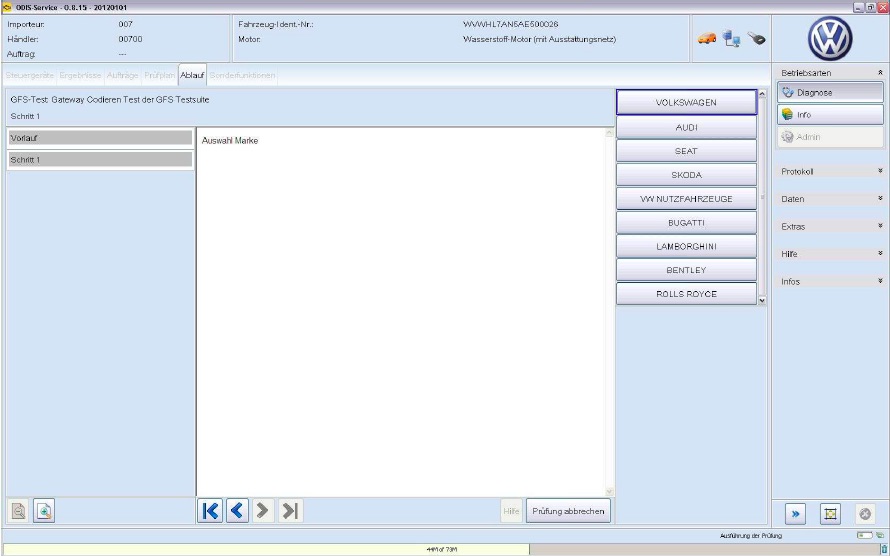
gateway-coding-with-odis-3
(Special coding - brand selection)
Clicking on the information to be coded open the window with the next inquiry.
After all the decisions for special coding are made, the user must confirm one more time that the Gateway coding
should be written now:
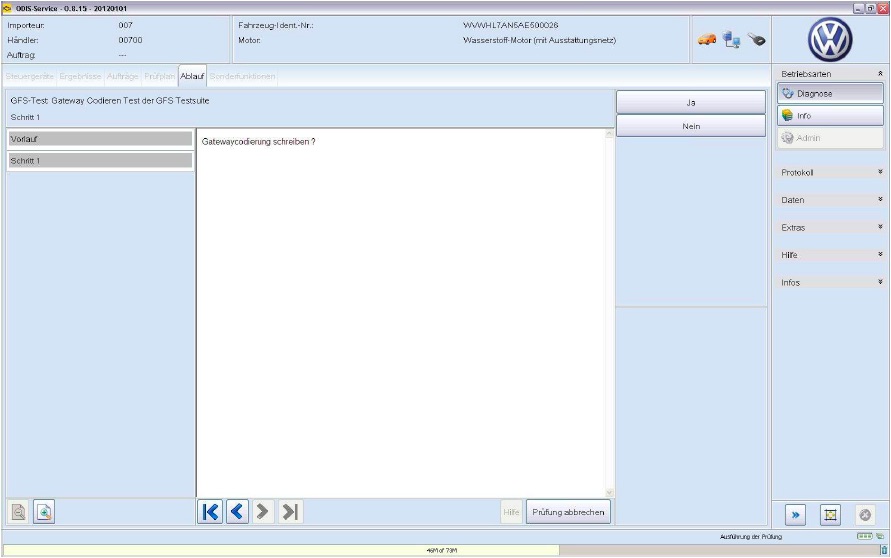
gateway-coding-with-odis-4
(Inquiry before writing the Gateway coding)
If this test step is answered with  yew, then the coding will be written into the control module.
With  No, the coding is cancelled. If the selection of coded control modules was changed earlier, then the user is
instructed to confirm the cancellation.
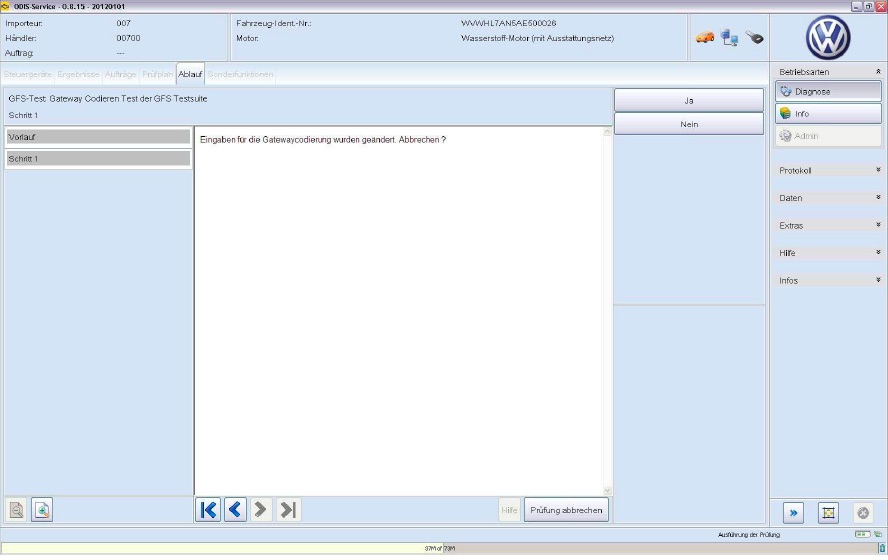
gateway-coding-with-odis-5
(Inquiry with changed coding)
Clicking on  yes cancels the coding.
With  No the new coding is written into the Gateway control module.
How to use VCDS software for gateway coding?
This guide is intended for use in conjunction with the VCDS VAG‐COM Diagnostic Software and  the Ross‐Tech HEX+CAN‐USB Interface cable.
We recommend at least a 500 MHz Pentium‐3 (or AMD equivalent) with 64MB of RAM and      Windows 98 or newer. USB interface cable works best with Windows XP or newer on a 1 GHz or  faster PC, or on Vista on a machine robust enough to support that that operating system.           USB interfaces will not work at all with Windows 95 or NT4.
WARNING: The author/publishers of this guide accept no responsibility for damage that may       occur from improper use of the VCDS Software/interface cable use. The guide should only be used for coding the Bluetooth Gateway for Volkswagen Bluetooth kit. The use of the VCDS Software for other purposes is highly discouraged by the author/publisher  of this guide
Bluetooth Gateway Coding Process
  1. Make sure the computer you are using has the VCDS software installed correctly and that  the USB interface cable software drivers are also installed correctly.
  1. If you are using a laptop or portable computer please ensure that there is sufficient battery  life or that it is connected to its power supply.
  1. Make sure that the vehicle is either connected to a suitable power supply or that the engine  is running. The vehicle must have a good and constant power supply while the car is being  coded for the Bluetooth Gateway.
DAMAGE MAY OCCUR TO THE VEHICLE IF EITHER THE VEHICLES BATTERY OR THE COMPUTERS  POWER SUPPLY ARE INTERRUPTED DURING CODING.
  1. Turn the vehicles ignition on. If the car is not connected to a suitable power supply, start the  engine and leave running with no vehicle accessories (A/C, radio etc) running. Do not turn  accessories on/off during coding.
  1. Connect the HEX+CAN‐USB Interface cable to the vehicles OBDII diagnostic port, this is      usually located underneath the dash on the drivers side of the vehicle. Correct connection  will be verified when the LED on the cable head lights GREEN.
  1. Connect the USB end of the cable to the computer and start the VCDS program.
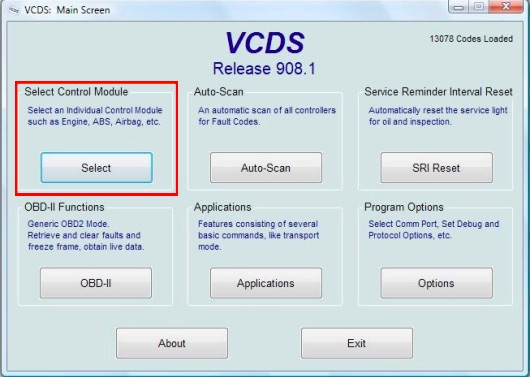
gateway-coding-with-vcds-1
  1. This is the first screen of the VCDS program. Push “Select Control Module”
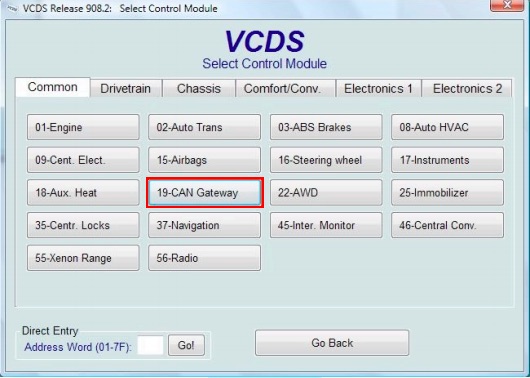
gateway-coding-with-vcds-2
  1. Select control module: 19-CAN Gateway
gateway-coding-with-odis-3
  1. Install Push: Installation List
gateway-coding-with-vcds-4
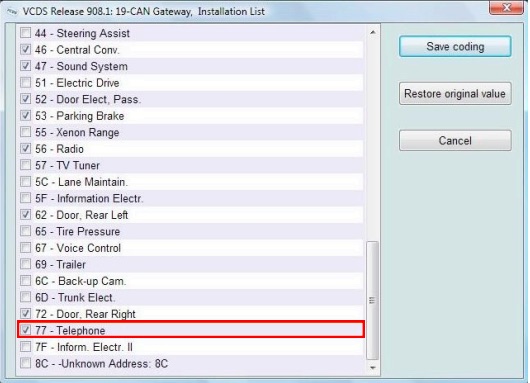
  1. Scroll down the installation list and make sure the check box is ticked for “77‐Telephone”
  2. Once the check box is ticked push: save coding
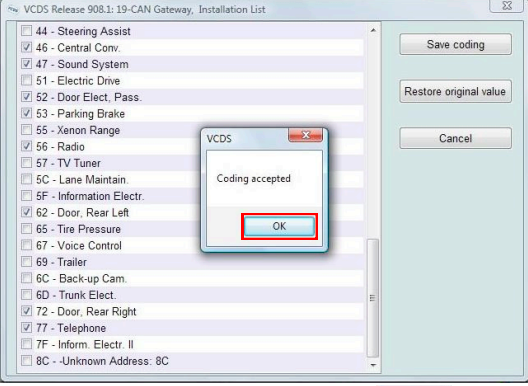
gateway-coding-with-vcds-5
  1. The above screen should then be seen. Push  OK
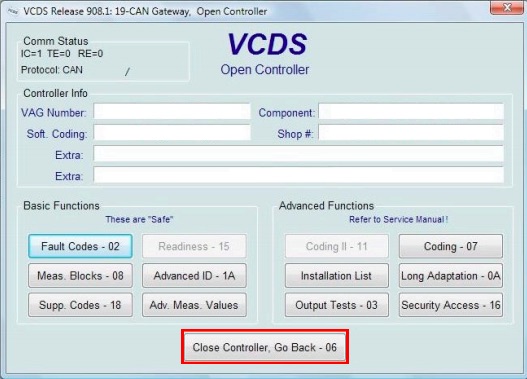
gateway-coding-with-vcds-6
  1. The program will then revert back to the above screen. Push Close Controller, Go Back - 06
  1. On the next screen push Go Back
  1. On the next screen push Exit to exit the programme.
  1. The Bluetooth Gateway phone screen should now be available in the vehicles MFD+ display.

Sunday, July 8, 2018

Steps to do VAS5054A EDIC configuration 

To give power to vas5054a for the tests with edic configuration:

you need to provide power to the Vas5054a either with car's obd port or with an external 12v power supply. Just watch for the correct obd power pins.


Tips and Guides:  open options screen while using edic configuration where the buzzer settings are to change buzzer settings

you can check it while connecting it with USB connection.

1.Open "ODIS Service Diagnostic Interface Configuration" (Softing EDIC Configuration Manager)
2.Select "VAS5054 S#0821xxxxx" from the left side and click on USB(under the bluetooth).
3.Click on the gear button (i think its the middle one)on the right side.
4.Now click on the "device" button.
5.Then you will see 2 options.
First one is enable buzzer and second one is enable power off.
Try to change some values here on this page like buzzer time and see if you are able to change.

Friday, June 15, 2018

VAS5054A ODIS 4.3.3 ODS2522E Error: Solved on 64 bit Windows

Laptop: Panasonic cf53
Connection: Bluetooth

Error message:
After paring 5954A unit with my Panasonic cf53 and setting up the Bluetooth and EDIC ok then open Odis 4.3.3 while it’s connecting I get error message:
ODS2522E

Infrastructure:
The vehicle interface hardware used here is not supported.


Thinking it could be a laptop issue as I can pair the 5054a with a later cf54 and it works fine also try to connect it to 2 other cf53 and get the same error

Suggestion & Solution tested by cardiagtool professionals:

Pls try odis 4.3.3 on 64 bit Windows
Then solved!
Note that you’d better have tested odis 4.3.3 software esp. cheap cracked version
It’s not a good idea to get free odis from forums coz many posters just tested on their own cars and have no enough knowledge of software compatibility that they cannot offer good tech support when someone has issues. Anyway, good luck!
This is odis 4.3.3 cracked but tested on hundreds of cars...

Solution from folks in mhhauto.com:

Follow this steps :
1.- Install ODIS-S as usual but NO restart !
2.- Rename the folder Softing from Program Files (x86) (or Program Files) to Softing.ori
3.- Copy the downloaded Softing folder to Program Files (x86) (or Program Files).
4.- Restart
5.- Install Postsetup
6.- Install ODIS-E 8.1.3 as usual
7.- Thats All !
UPDATE :
1.- Replace Softing directory with the updated directory and you get this...
DOWNLOAD Softing OK UPD:
https://mega.nz/#!FcVgxSYT!6mEcIN2nQqMcwF4TZA31JVJx3WEGI4pjuAb1TyPmO7Q
Credits to O.P. from http://mhhauto.com/Thread-UPDATED-ODIS-S-4-3-3-AND-ODIS-E-8-1-3-solution-for-clones

Sunday, March 11, 2018

ODIS Engineering 8.1.3 Free Download


Free download Offboard Diagnostic Information System Engineering 8.1.3 with released notes:


ODIS Engineering 8.1.3 Links:

Setup File

https://mega.nz/#F!ggIR1bZC!WpTJr-aaT-WGaMjPP4a-3Q

Post Setup

https://mega.nz/#!mEoXAKIA!rLrHTAGk0DgQwNDRUSd4QEIlXe5RaJgXnh6m2bkR21M

Softing folder Trick

(Just delete the old Softing folder in Program Files Folder that you have and put this one in case you have already old ODIS before)

https://mega.nz/#!mMggQLiA!6nAx4i2BwCkbmxEeCSPHz1mn5MAeEa3HRO4ocEhIQ5A

In case you install ODIS 4.3.3 for the first time and you don't have before any old ODIS before then

Just delete the Softing folder from Program Files folder and paste this one as per this link below

https://mega.nz/#!mMggQLiA!6nAx4i2BwCkbmxEeCSPHz1mn5MAeEa3HRO4ocEhIQ5A

Full Launcher with License

https://mega.nz/#!U74SEZqS!yFrVx7f1E4DSnMqj7OYY7FP5zo5_XDzrtJdthu0bi-c

ODIS-E 8.1.3 Full

https://mega.nz/#F!ZMkwkLxb!dlXoDFIBPnXhVziZdQsL2w

ODIS Engineering 8.1.3 Released Notes:

Restrictions

Windows 10 only supports the new diagnostic interface VAS 6154 (known as the WLAN remote head). Users of the older models VAS 5054, VAS 5054A and VAS 5055 can continue to use the Windows 7 i.do client on existing systems until 2019 or acquire the Windows 7 i.do. client from IT Client Support for replacement devices. The new diagnostic interface can be used with both operating systems. Please place any necessary orders with Workshop Equipment in good time.

Functions in version 8.1

The key features newly added or revised in release 8.1 are described briefly in this section and the additional CCB_DS IDs implemented are cited.

CCB_1325

Der Diagnosetester muss PKI Anmeldungen zu den unterschiedlichen Systemen unterstützen.

CCB_1623

Die Einbindung und Verwendung von VCI in den Diagnosetester muss überarbeitet werden

CCB_1981

ODIS muss den Schutz der Fahrzeugdiagnose SFD umsetzen. (nicht final)

CCB_2021

ODIS muss mit dem Diagnose-Firewall-Mechanismus in Gateways angemessen umgehen.

CCB_2081

Die ODIS Applikationen muss DK1/2-Sollverbaulisten schreiben können.

Jira_575

Controlnames-Erweiterung Testautomatisierung: Admin-Lizenzinformationen

Jira_629

Erweiterung der Preset Leeren Funktionalität (Stellglieddiagnose, Grundeinstellung)

Jira_742

Erweiterung der Uninstall Funktionalität

Jira_804

Fehlerkorrektur beim Zurücksetzen einer Filter-Maskeneinstellung für die Diagnosefunktion „Ereignisspeicher“ im Admin-Bereich

Jira_805

Integration von Case-Insensitiven Dateibezeichnungen beim Datensatz schreiben

Jira_848

Einbau der Button „+“ und „-“ in den Funktionen Messwerte und OBD Mode

Jira_857

Anpassung der Tracing Speicherorte (z.B. Entfernung PV-Traces)

Jira_873

Integration eines Warnhinweises beim Protokollieren in der Funktion „Gesamtsystem auslesen“

Jira_875

Anpassung von Übersetzungen

Functions in version 8.1

The key features newly added or revised in release 8.1 are described briefly in this section and the additional CCB_DS IDs implemented are cited.

Jira_877

Controlnames-Erweiterung Testautomatisierung: Admin-Tabs und Admin-Gruppen

Jira_884

Einbindung Vector VCIs

Jira_887

Anpassung Messwerte um Tooltips und Enablement

Jira_895

Anpassung der Anzeige des Sendestatus beim Protokollversand (leichteres Erkennen von nicht erfolgreich versendeten Protokollen)

Jira_897

Anpassung der Messwerteprotokollierung für Ergebniswerte mit identischem ODX-Pfad

Jira_900

Ausgabe der RDID für den stellgliedspezifischem Messwert

Jira_907

Erweiterung Fehler-Handling und Ausgabe eines inhaltlich passenden Fehlerdialoges beim Laden einer Datei in der Funktion „046.01 Codierung / Anpassung“

Jira_911

Integration der Umgebungsbedingungen im DTC-Snapshot Export-Protokoll

Jira_912

Anpassung der 5-Baud-Adressermittlung bei OBD-Löschen (funktionaler Aufruf)

Jira_915

Korrektur der Byte-Konvertierung beim Lesen der Speicherzellen

Jira_934

Entfernung DoIP-Tracing aus der Administration

Jira_944

SFD: Verwendung der Control-Option 0x02 bei der Ermittlung der SFD-Abfragestruktur

Jira_953

SFD: Entfernung der Auswahl „Schwache Authentifizierung“

Jira_955

Entfernung des ReleaseNotes-Dialoges beim Start von ODIS Engineering

Jira_967

Dummy-VIN bei der SFD-Freischaltung, wenn keine reale VIN ermittelt wurde

Defect resolution in version 8.1

The defects resolved in release 8.1 are described briefly in this section.

CR QC18371

/VAS 6154 - USB - CAN/ ODIS-E friert ein beim Lesen des KD-OBD Mode 09

CR QC19085

Tab-Bezeichnung für die Fahrzeugfunktion "047-Gesamtsystem auslesen" wird zum Teil übersetzt

CR QC19228

Identifikation: ENTER-Taste bei Fokussierung des Toggle-Buttons "Standard-/Erweiterte Identifikation anzeigen" ohne Funktion

CR QC19233

Zwei nicht durchgängig verwendete englische Übersetzungen in den Funktionen zum Ereignisspeicher

CR QC19285

Tippfehler in den Oberflächentexten: "Sondernzeichen" statt "Sonderzeichen"

CR QC19454

Update von R7.2.2 auf R8.0.3: Beim Update nicht aktualisierte Dateien

CR QC19460

Übersetzung: Fehlender übersetzter Hinweis im Bereich Admin --> Allgemein --> Multilink

CR QC19461

Übersetzung: Protokollierung Entwicklerereignisspeicher in nicht-deutscher Spracheinstellungim Ergebnisprotokoll

CR QC19503

Stellglied-Messwert Filterung bleibt nicht konstant nach Falscheingabe - SG wieder alle eingeklappt

CR QC19546

Bei Anpassung werden noch nicht geschrieben Eingabeparameter nicht angezeigt.

CR QC19562

SFD-Zugriffsberechtigung: Anzeige der Rückgabewerte zum Freischaltstatus ist abgeschnitten

CR QC19574

Inkonsistenzen im Build zum R8.1.0 (B81_0_0_6) von der Nosbox

CR QC19579

Update von R8.0.5 auf R8.1.0 schlägt fehl

CR QC19580

Flashfiles und BZD-Protokolle können nach Umstellung auf PKI-Anmeldung nicht von System42 geladen werden

CR QC19585

WebSchnittstelle: Setzen der Marke für Übertragung von BZD-Protokollen an Carport nicht möglich

CR QC19610

Falschsetzung der Checkbox zum Wechseln zwischen Diagnose und Adminbereich nach Wechsel der Sprache

CR QC19611

Anpassung: Unvollständige Änderungskennung für Presets

CR QC19658

VCI Verbindung VAS5054 nach Verbindungsabbruch konnte nicht wieder automatisch hergestellt werden

CR QC19695

Downgeloadetes Update wird bei USB-Anbindung eines VAS6154 nicht ausgeführt

Tuesday, February 27, 2018

How to get ODIS 4.3.3 For VAS 5054A


Bad clones of VAS5054a not gonna work with this version 4.3.3.

Even those that works with ODIS 4.2.3.


I mean, VAS5054a clones work on 4.3.3 with PDU 041 only. But not working with PDU 042

For bad clones just need to downgrade PDU from 042 to 041

Remove EDIC 1.20.42 from PC

Then install this older EDIC attached:

https://mega.nz/#!URV1nLwa!mn6xoEUmQeyCwhes1tDB6qvp20trgDUYy6BVNxRnLUk


If you should check post install (before you plug in your device) in Add/Remove programs you should see Softing D-PDU API V1.20.042 EDIC_D_PDU_API_OE/OS
Remove these from PC and reboot (just in case)
Install the EDIC provided above with version 041
Then plug in your device and test

I myself have not tested the above, but I think I works

But if you want use ODIS easily for VAS 5054A clone head, choose ODIS 4.2.3. It's a tested version, confirmed to work no issues

Good luck!

VAS5054A software can't install on Windows 10?

In a native way ODIS software it's not working on Windows 10 (with VAS5054A head).

The "problem" is not with the drivers.


If you install PDU alone on win10, the device is accessible and the drivers working properly. There is no problem with the drivers i guess. Odis 3.0.3 is working with win10 without any problem with older drivers native way. This is why i think, there is no problem with the drivers.

What i assume is that VAG is starting to make vas5054 useless, because of the lot of clone devices. VAG will make every garage buy the new head and cut the vas5054 support from Odis. After 2020 there won't be 5054 support and they say because of win7 support is over... It is all about business i guess...

Odis is a huge java code monster. What can be unsupported via java vm with win10 what can be supported on win7?

Here, i collected good tips on the web for you all. About ODIS and Win 7 Win 10 install. Hope it helps.

Odis install on Windows 7 or Windows 10?

Tip 1: install sw, connect 5054a head, install driver, run odis

No need any settings

After install, connect your vas5054a in OBD and USB, install driver.

Open your Odis! All will work

Tip 2: Windows 7 x64, not windows 10


True, but only on win7 x64 not win 10 x64

"Windows 10 only supports the new diagnostic interface VAS 6154 (known as the WLAN remote head). Users of the older models VAS 5054, VAS 5054A and VAS 5055 can continue to use the Windows 7 i.do client on existing systems until 2019 or acquire the Windows 7 i.do. client from IT Client Support for replacement devices. The new diagnostic interface can be used with both operating systems. Please place any necessary orders with Workshop Equipment in good time."

Tip 3: a clean Windows 7 is the best way

I will prefer you to use windows 7 for all the diagnostic devices, this is because of the security of the windows 10. The best way to get a good working diagnostic program is to have one and only laptop for this. A clean windows 7 i are the best way, but this is only my experience

Odis-e,-s on same laptop, Windows x64? x86?

Tip 1: odis-e odis-s same laptop, x64 better

Both odis e and odis s can work together on same laptop partition. no problem. For newer versions will be better x64.

Tip 2: x86 much better, no lack of functionality

x86 is soooo much better since there is no any lack of the functionality for any kind of driver of ur laptop , I test both x86 is better and u can install both yes ODIS-S and ODIS-E

Tip 3: on Windows 7 x64, perfect


Works perfectly on Windows 7 x64, I have Engineering 7.2.2, Service 4.1.4 and Service 4.2.3 in same partition and no problem, if you execute any of them in Windows 10 you won't be able to select vas5054a.

Tip 4: on Windows 7 64bit works very well


I installed on win7 64bit and it installed and I added the update file from the download, starts and works very well, thank you all for your guidance and comments.

Tuesday, January 30, 2018

VAS 5054A 6154 ODIS-S 4.3.3 Free Download

Offboard diagnostic information system service ODIS-S 4.3.3 free download:


IT´S only Original Setup -> NO Patched Launcher NO Postsetup NO License!!

This version has same level of d-pdu api as odis-e 8.1.3
All proper vas heads with amb2300 genuine will work as a charm, same as all passthru interfaces supported.

IF YOU WANT INSTALL YOU NEED HAVE - LAPTOP NEW WINDOWS ( can work win7 and 10 ) - dowload database from erwin * window 10 can work j5234 and vas6154 win 7 can work j5234 , vas5055, vas5054, vas6154


YOU ARE TRYING ODIS 4.3.3 ON YOUR OWN RISK!!!!!!!!!
Professionals have not tested it yet!

For sake of SECURITY, go for the latest ODIS 4.2.3 TESTED version:
Look here:http://www.cardiagtool.co.uk/newest-odis-223-software-for-vas-5054a.html


verified to work no issues.!!!!!!!!!!
Odis install on Windows 7 or Windows 10? 

Tip 1: install sw, connect 5054a head, install driver, run odis
No need any settings ;-)
After install, connect your vas5054a in OBD and USB, install driver.
Open your Odis! All will work :-)

Tip 2: Windows 7 x64, not windows 10
True, but only on win7 x64 not win 10 x64

"Windows 10 only supports the new diagnostic interface VAS 6154 (known as the WLAN remote head). Users of the older models VAS 5054, VAS 5054A and VAS 5055 can continue to use the Windows 7 i.do client on existing systems until 2019 or acquire the Windows 7 i.do. client from IT Client Support for replacement devices. The new diagnostic interface can be used with both operating systems. Please place any necessary orders with Workshop.

Equipment in good time."

Tip 3: a clean Windows 7 is the best way

I will prefer you to use windows 7 for all the diagnostic devices, this is because of the security of the windows 10. The best way to get a good working diagnostic program is to have one and only laptop for this. A clean windows 7 i are the best way, but this is only my experience

odis-e,-s on same laptop, Windows x64? x86?

Tip 1: odis-e odis-s same laptop, x64 better

Both odis e and odis s can work together on same laptop partition. no problem. For newer versions will be better x64.

Tip 2: x86 much better, no lack of functionality

x86 is soooo much better since there is no any lack of the functionality for any kind of driver of ur laptop , I test both x86 is better and u can install both yes ODIS-S and ODIS-E

Tip 3: on Windows 7 x64, perfect

Works perfectly on Windows 7 x64, I have Engineering 7.2.2, Service 4.1.4 and Service 4.2.3 in same partition and no problem, if you execute any of them in Windows 10 you won't be able to select VAS5054Al

Tip 4: on Windows 7 64bit works very well

I installed on win7 64bit and it installed and I added the update file from the download, starts and works very well, thank you all for your guidance and comments.