Pages

Wednesday, October 25, 2017

How to use VAS 5054A via USB

How to connect, install, use VAS 5054A via USB?

Look here:

When you use vas5054a via USB connection?

In special cases you can also operate the VAS 5054A using a USB cable connection:
- To configure the VAS 5054A in the Diagnostic Interface Configuration Utility program (Bluetooth settings, activation of the built-in buzzer, auto power off),
- For use in areas in which wireless communication is not permitted,
- For applications that require a high-performance connection to the vehicle.

How to install vas 5054a via USB?

If you want to install the VAS 5054A only via USB when installing the application software, do not yet connect the VAS 5054A to your PC. When the Select EDIC to install dialog box opens, click Cancel. The application software is completed without installing a diagnostic interface.

Plug the VAS 5054A into the diagnostic connector. Open the rubber cover on the front of the VAS 5054A and attach the mini USB connector of the supplied USB cable. Connect the USB cable to a USB port on your application PC.

The following description assumes that the diagnostic application has already been installed.
vas5054a-usb-connection-1

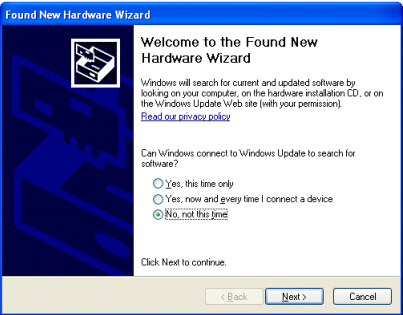
(Fig. 3-25 Windows Found New Hardware Wizard )
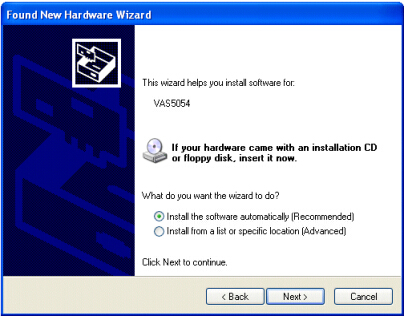
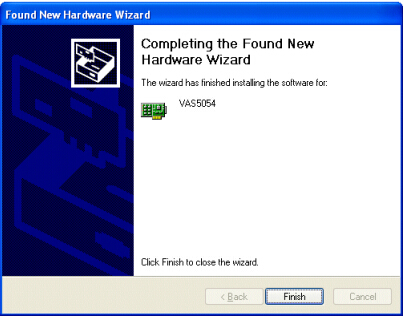
Windows automatically detects the VAS 5054A through Plug and Play. In Windows 2000 the drivers are installed without a confirmation prompt, in Windows XP the Found New Hardware Wizard launches (see Fig. 3-25). When prompted if you want to connect to Windows Update, select No, not this time (Fig. 3-25). Click Next> to continue installation. Select the Install the software automatically radio button and click Next> (Fig. 3-26). Click Finish to close the wizard (Fig. 3-27).
vas5054a-usb-connection-2
(Fig. 3-26 Automatic installation of the driver files for the VAS 5054A )
vas5054a-usb-connection-3

(Fig. 3-27 Completing the wizard )
Your PC is now set up for a USB connection to the VAS 5054A and ready for use with your diagnostic application.

 
Thread: Vas5054a USB not showing up on device manager 

Hello.

I have brought a vas5054a cable with ok cool, good board and good Bluetooth.
The problem is that I tried to connect it over Bluetooth, which I was able to in the manager. Then I opened odis and would try diagnostics but odis could not find the interface
So I would try with USB. But when I turn off Bluetooth and plug in the USB, then nothing happens. I have also tried on Linux and it does not seem like the interface gets an connection to the computer at all.
I have tried different USB cables and I have looked on the PCB, but everything looks ok.
What can it be?

Rely: you have to re-identify ur interface by odis it self in diagnostic option to the right side column when you wanna change the connection.

Sunday, October 22, 2017

VAS 5054A Odis-E 7.2.2 cant run under VMware

Topic: VAS5054A Odis-E 7.2.2 cant run under VMware?

Question:


When I try to run Odis-E 7.2.2 it says "This program cannot be run under VMWARE"

Answer:


Close VMWare
Go to your virtual machine folder
Make a backup of your VMWare virtual machine file (.vmx) and rename it xxxx_backup.vmx or something like that
Open the original .vmx file in Notepad and add the following text all the way at the bottom:

Code:

isolation.tools.getPtrLocation.disable = "TRUE"
isolation.tools.setPtrLocation.disable = "TRUE"
isolation.tools.setVersion.disable = "TRUE"
isolation.tools.getVersion.disable = "TRUE"
monitor_control.disable_directexec = "TRUE"
monitor_control.disable_chksimd = "TRUE"
monitor_control.disable_ntreloc = "TRUE"
monitor_control.disable_selfmod = "TRUE"
monitor_control.disable_reloc = "TRUE"
monitor_control.disable_btinout = "TRUE"
monitor_control.disable_btmemspace = "TRUE"
monitor_control.disable_btpriv = "TRUE"
monitor_control.disable_btseg = "TRUE"
usb:0.present = "TRUE"
usb:0.deviceType = "hid"
usb:0.port = "0"
usb:0.parent = "-1"

Save it, close it.
Then it will work again. I've got ETKA8, Elsawin 6, ODIS-S 4.2.3 and ODIS-E 7.2.2 running in just one virtual machine at Windows 7 x86.

Warning: VMware Tools will not work anymore, so no easy/copy paste anymore. Be creative on that problem, for example use your automatic syncing cloud-storage or something like that.

Video: Odis-E Windows 7 native install


src: http://blog.cardiagtool.co.uk/how-to-install-odis-engineering-6-7-5-windows-7/

Feedback:

This solution worked for me

I added this to my .vmx files and seems to do the trick
Odis 7.2.2 now running in virtual machine
monitor_control.restrict_backdoor = "TRUE"

Saturday, October 21, 2017

Cloned VAS 5054A PCB rework

Cloned VAS 5054A PCB rework... here you go.

the bluetooth module is a fake one since it has no capacitors and no resistences on the back.
Open these images if you are interested and save them on your computer. Then you can zoom on them and see more clear all parts.

This is the original bluetooth without shield AMB2300 and back of it.

Credits to fantomel

If you’re not equipped with technical knowledge and experience, better not take a risk to try it. Maybe there will be some damages on your car. VAS5054 genuine should be your best solution. But, if your budget is limited, have a try with a HQ VAS 5054 clone! Attention please! Various VAS5054A clone flood into the market, some good and some bad. You should make a decision yourself.

Most VAS5054A clones are one of the biggest lottery of all.

A lot of fake chips, fake amb's , fake infineons......or missing or reinterpreted projects.
As you well know prices for chips and making a pcb has evolved in - a lot and all these tools use old and cheap chips. Same as a new car has a price, has exited factory min -500 eur. In old days all tools were made at hand, now because of tech is done automatic, so less costs, same for pcb's and funny same for old chips.

Most Chinese do not want to make them proper, that is all. They all have projects and projects of projects, all remade to cut costs and sell some more reinvented stuff. 

SO take a good look when you buy, take a very good look at what you get when you get it and in 90% of cases you will need to do more or less rework on it.

This is Quality A+++ VAS 5054 china clone with GREEN pcb, with real amb2300 and oki


The green version has made up a item number in china to subdivide the different products and qualities.

It is supposed to be the best quality clone. Everything that is needed. The quality looks fine and the AMB2300 Bluetooth (AMB2300 IS THE MAIN THING!!!) as well as the OKI Chip (w/o leg cut) are on the green PCB.

Practice says otherwise, different sellers have different qualities! Best advice is to be sure through clear pictures of the PCB, and even then they can send you something else. 

Vas 5054a clone above is verified to:
have the real AMB2300 and OKI chip.
works perfect with ODIS 4.1.3 software crack
it’s OEM, so it fully supports every VAG model
and it’s best for flashing
online coding service also OK


Other VAS5054 copy with bad reviews! Forget it! !!!!!!!!!

Vas5054a with white PCB:


Vas5054a with blue PCB:


Friday, October 20, 2017

Vas 5054a USB not showing up on device manager

Hello, I have brought a vas5054a cable with ok cool, good board and good Bluetooth.

The problem is that I tried to connect it over Bluetooth, which I was able to in the manager. Then I opened odis and would try diagnostics but odis could not find the interface

So I would try with USB. But when I turn off Bluetooth and plug in the USB, then nothing happens. I have also tried on Linux and it does not seem like the interface gets an connection to the computer at all.

I have tried different USB cables and I have looked on the PCB, but everything looks ok.

What can it be?

Rely: you have to re-identify ur interface by odis it self in diagnostic option to the right side column when u wanna change the connection

Connecting and Installing the VAS 5054A via USB

In special cases you can also operate the VAS 5054A using a USB cable connection:

- To configure the VAS 5054A in the Diagnostic Interface Configuration Utility program (Bluetooth settings, activation of the built-in buzzer, auto power off),

- For use in areas in which wireless communication is not permitted,

- For applications that require a high-performance connection to the vehicle.

If you want to install the VAS 5054A only via USB when installing the application software, do not yet connect the VAS 5054A to your PC. When the Select EDIC to install dialog box opens, click Cancel. The application software is completed without installing a diagnostic interface.

Plug the VAS 5054A into the diagnostic connector. Open the rubber cover on the front of the VAS 5054A and attach the mini USB connector of the supplied USB cable. Connect the USB cable to a USB port on your application PC.

The following description assumes that the diagnostic application has already been installed.


(Fig. 3-25 Windows Found New Hardware Wizard )

Windows automatically detects the VAS 5054A through Plug and Play. In Windows 2000 the drivers are installed without a confirmation prompt, in Windows XP the Found New Hardware Wizard launches (see Fig. 3-25). When prompted if you want to connect to Windows Update,select No, not this time (Fig. 3-25). Click Next> to continue installation. Select the Install the software automatically radio button and click Next> (Fig. 3-26). Click Finish to close the wizard (Fig. 3-27).


(Fig. 3-26 Automatic installation of the driver files for the VAS 5054A )


(Fig. 3-27 Completing the wizard )

Your PC is now set up for a USB connection to the VAS 5054A and ready for use with your diagnostic application.

Thursday, October 19, 2017